Using hand signals is very important
Communicating your intentions with vehicles, cyclists, and pedestrians not only makes your ride safer, but it is also required by law in the United States. A responsible bicyclist uses many of the same skills and behaviors as a responsible motorists.
Predictability is key to your safety. Be deliberate and clear about your intentions. Have a commanding presence and use both hand signals and eye contact to communicate. Watch our 60 second video above to learn the basics of using hand signals.
How to use hand signals on a bicycle
When approaching an intersection, make sure you look around for any moving vehicles or pedestrians. Make sure to abide by the road signs, and always stop where there is a stop sign.
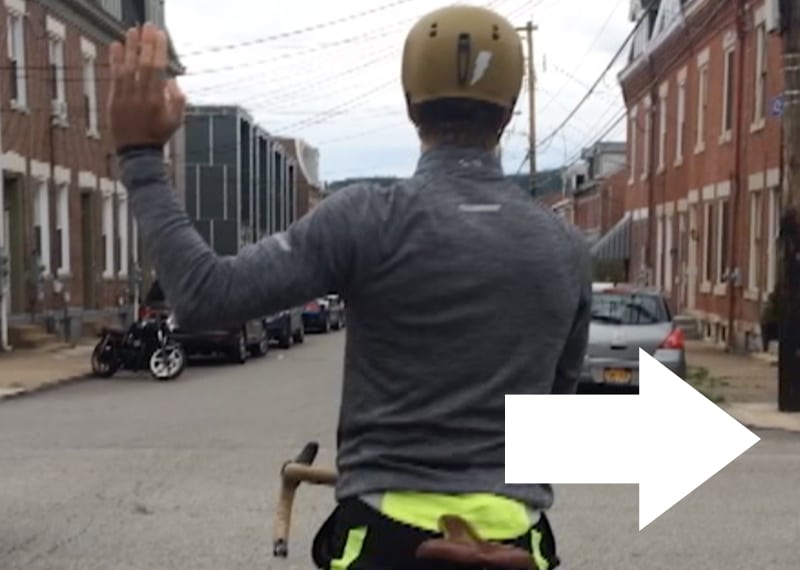
Right Turn
To make a right turn signal you have 2 options. You can either signal with your left arm by making an L shape signal or with your right arm. In each case, make sure your arm is fully visible to all around.

Left Turn
To make a signal left, use your left arm and point to the left. Make sure you full arm is extended and clear to drivers in front of you and behind you.

Slowing or Stopping
To signal that you are coming to a stop, extend your left arm down, with the palm of your hand facing the car behind you. Release your signal when you come to a complete stop


Now you know all of the basics…
Remember to use them when turning and stopping when riding on the road. Stay safe out there!
Read some tips, tricks, rights, and responsibilities
- Use BikePGH’s Pittsburgh Bike Map to plan your biking route
- Look over Biking 101 to review some tips on safe, easier commuting from state laws to sharing the road
- Plan your next bike ride with our Plan Your Route 60-second video

Sign up for Bike Pittsburgh’s newsletter, The Messenger, to get the latest news on events, bike and pedestrian infrastructure, and fun, delivered straight to your inbox. Twice monthly emails, no spam.